AR Game for Rehabilitation with Nreal Glass
Unity; C#; OpenCV; Machine Learning; Android
OVERVIEW
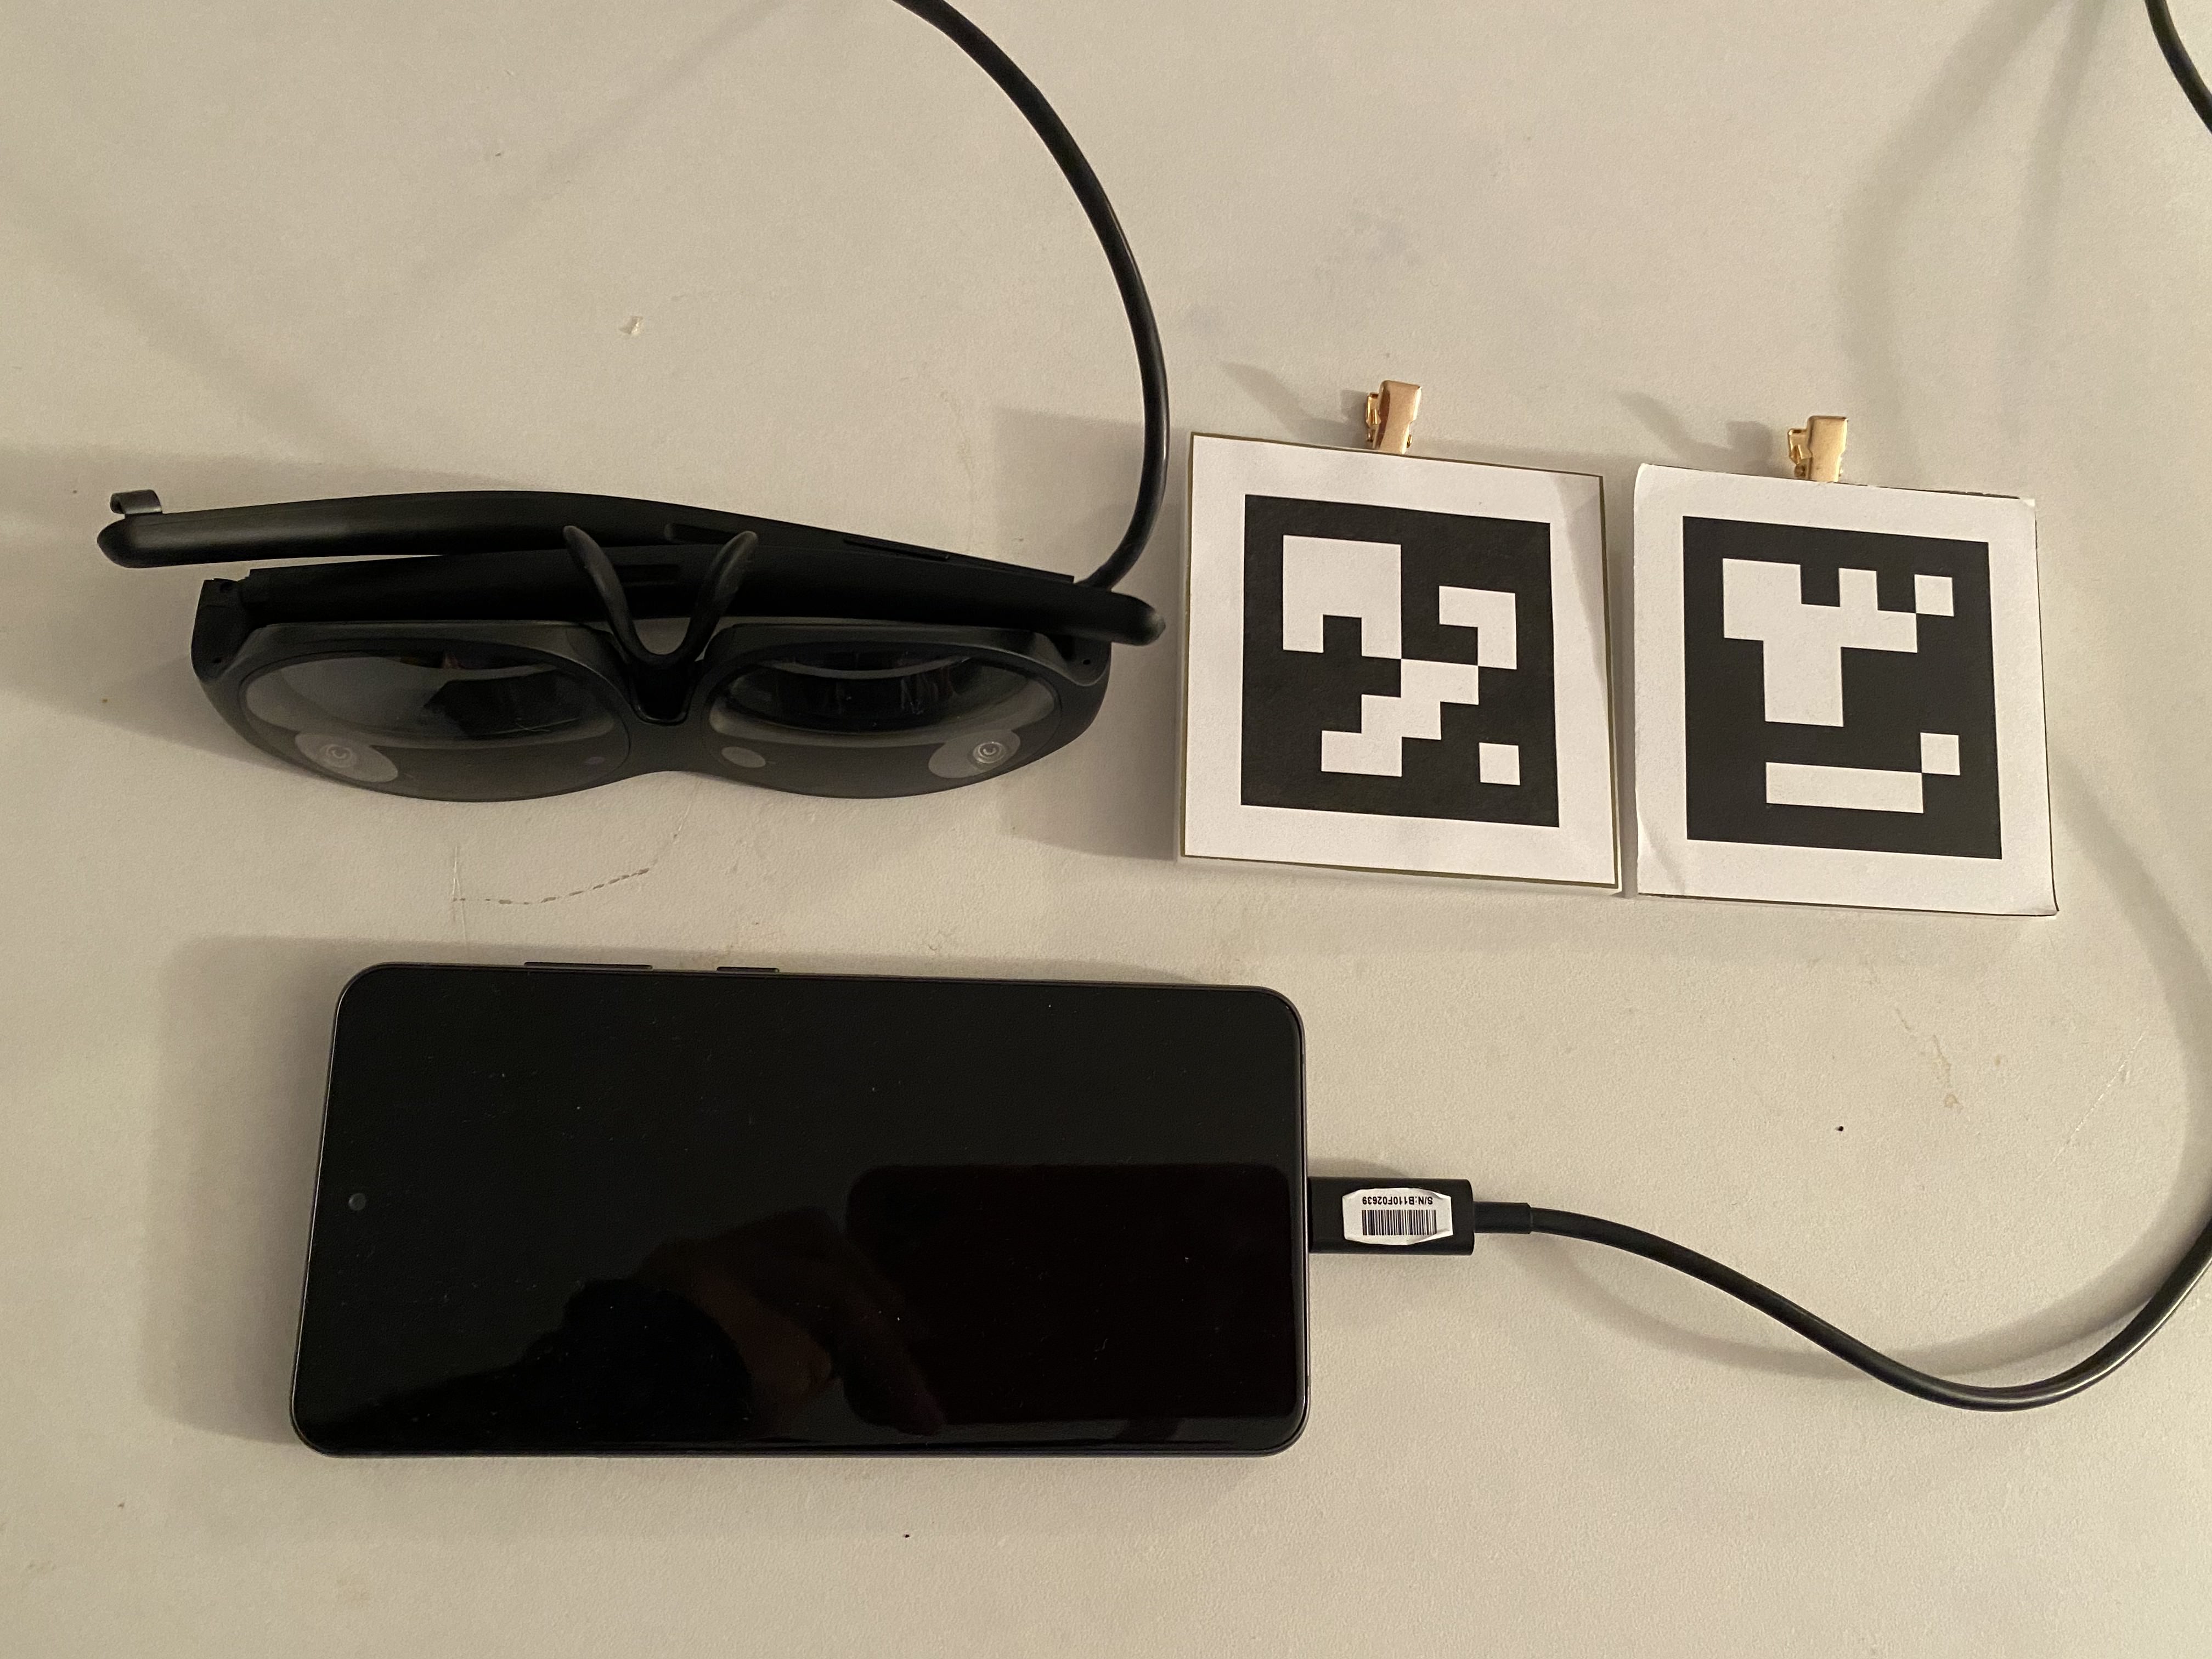
In this project, I designed an AR game system on Nreal AR glass, aiming to improve users’ walking ability through an interactive game setting. The idea originates from the Treadmill designed for recovery from stroke, where patients can step on different objects projected on top of the belt to earn different scores, and the sensors embedded inside Treadmill are responsible for detecting those collisions. However, the specially designed equipment is not only costly but also too heavy to carry around. That’s why a similar game system with portable AR glass for users to understand easily and use wherever they are is built. I used Unity, NrealSDK, OpenCV, and Machine Learning to utilize the project. The system consists of a pair of Nreal Light AR glasses, a Samsung Galaxy S21 Phone, and two ArUco tags with a size of 6cm*6cm on top of a supporting board with clips.
GAME MECHANICS
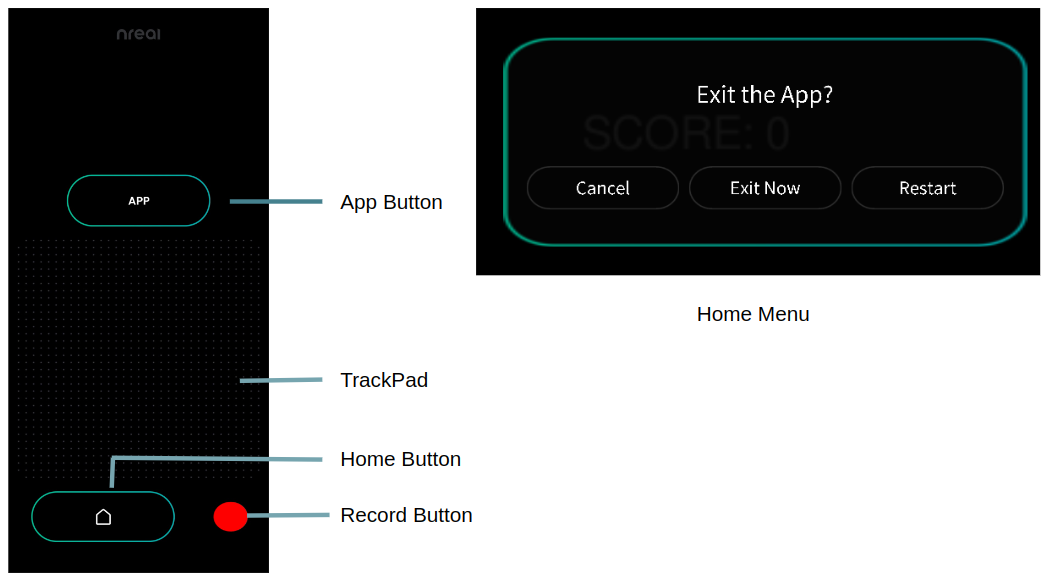
The game consists of 3 different steps. First is ground detection, and then a physician can build an obstacle map on top of the ground based on patients’ needs. And as their walking ability improves, the map can become more complicated and dense. Finally, the user will move around slowly and use their strategy to get higher scores. Let’s start by talking about the controller. The phone acts as the controller with 3 Degrees of Freedom, and a laser ray points out forwards from the controller holding hand, so the user can rotate the controller and press on different UI to make a selection. An explanation of the functions of the controller and the UI of the Home Menu is shown in the picture below.
Ground detection
For horizontal plane detection, move the head around and find a ground plane with some features or patterns, then virtual ground meshes will show up. Separate ground meshes will also be combined into a larger ground mesh.
Obstacles map building
A Selection panel will pop up in the top middle of your view. This position is not fixed in the world coordinate, instead, it is relative to the head pose.
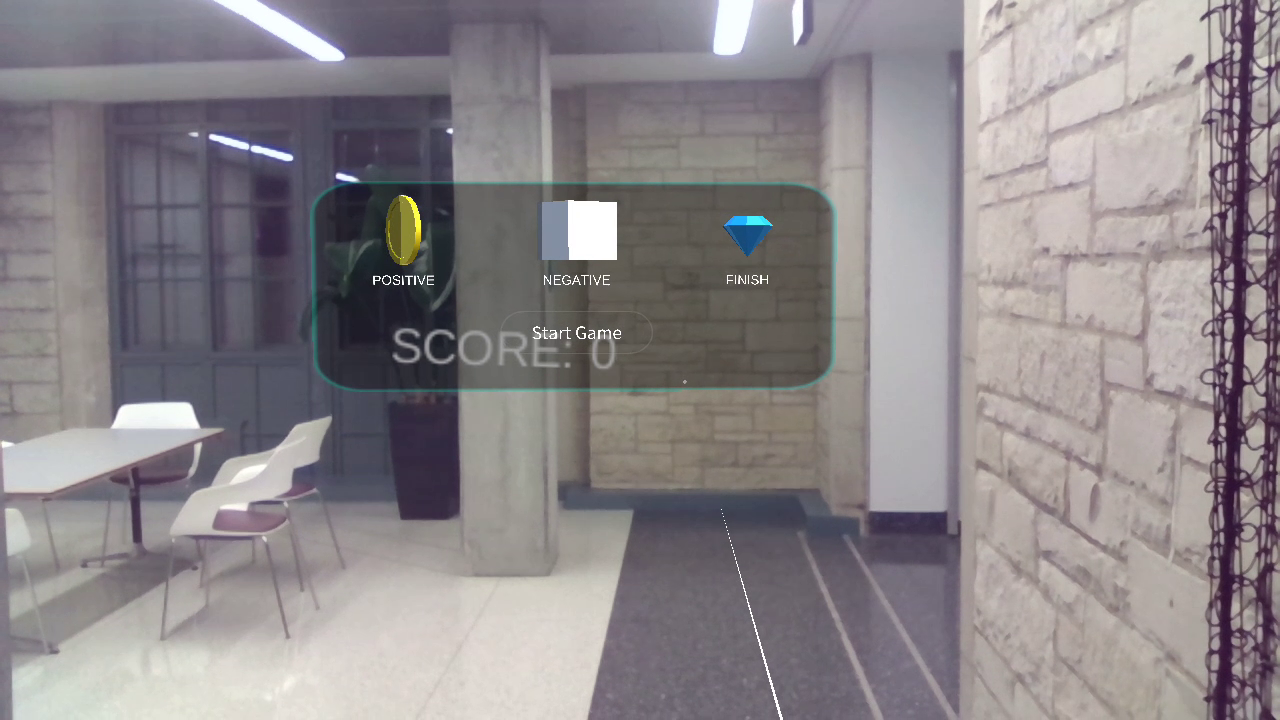
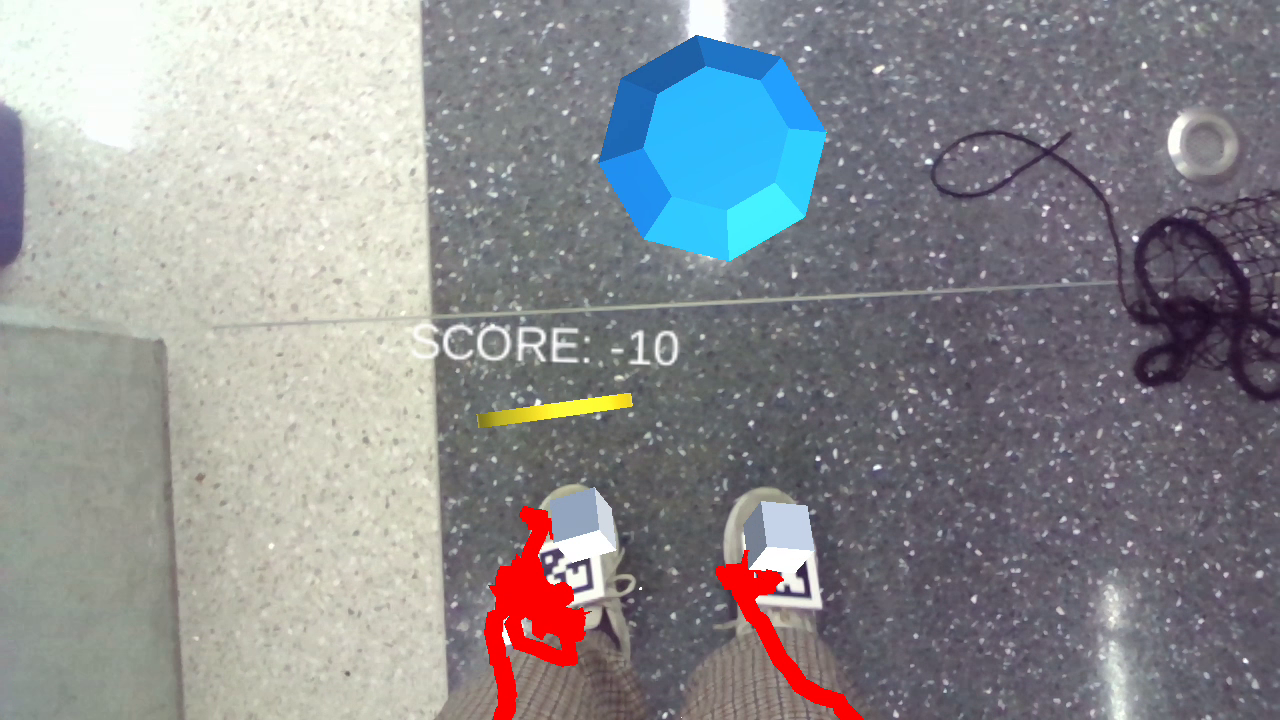
Select objects from the menu by clicking on TrackPad on the controller, each of the objects have a different score point. Collecting coins will receive positive scores, and cubes are barriers with a negative score, so they need to be avoided, Diamond represents the ending point of the game. Then move the controller, so the ray would intersect with the ground previously detected, then if you press the APP button, an object would instantiate on the ground at the intersection point. Press the TrackPad without lifting your finger to drag the placed objects using the ray to adjust the position. When finishing this step, you can click on “Start Game” in the scene. The panel and ground grid will disappear immediately.
Walking start
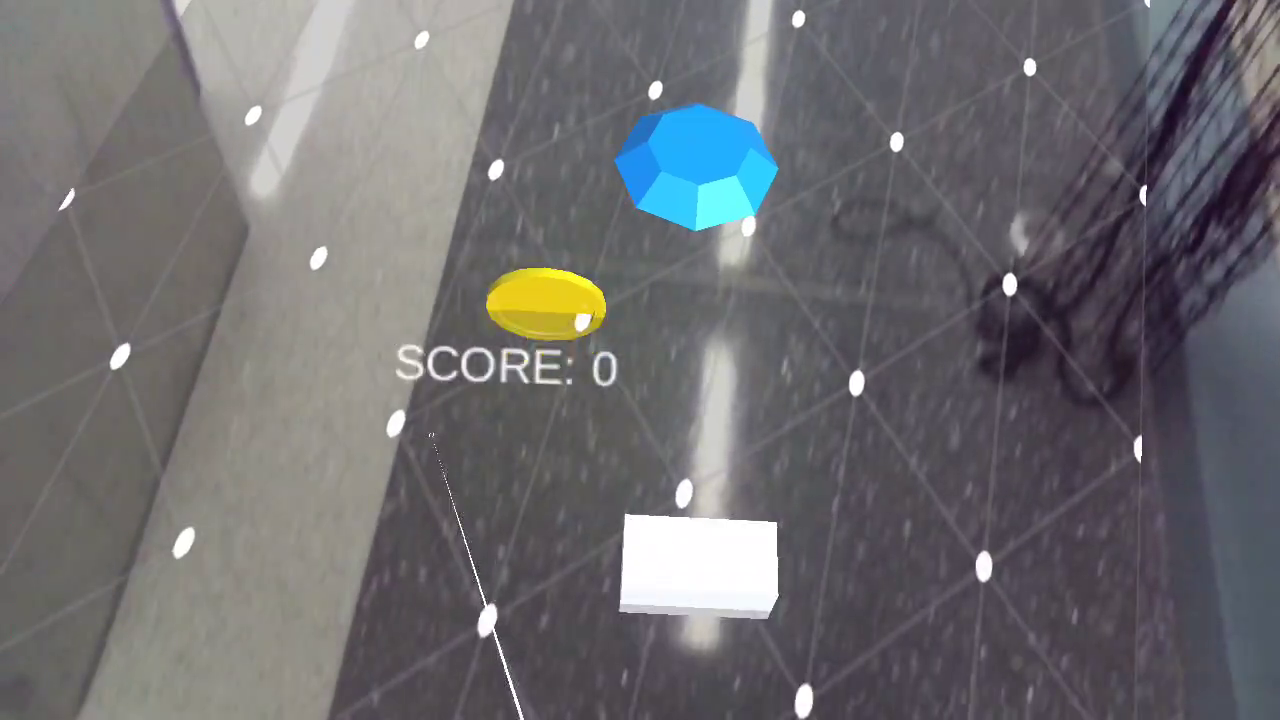
Next, the user needs to look down to make sure the maker is within range of sight. Then, two bright white cubes will pop up on top of the marker to represent the user’s shoes. Also, a score point text is floating on the left-top side of the screen to represent the current score. A red trajectory will also show up to track the historical position of the shoes. A text file keeping track of the position of the left and right feet in the coordinate can be found under the Documents folder on the phone. After reaching the endpoint, the selection panel and ground grid will be back on screen so the user can restart the whole game. The user could also press the Home Button and Select Restart to restart the game.
OBJECT DETECTION
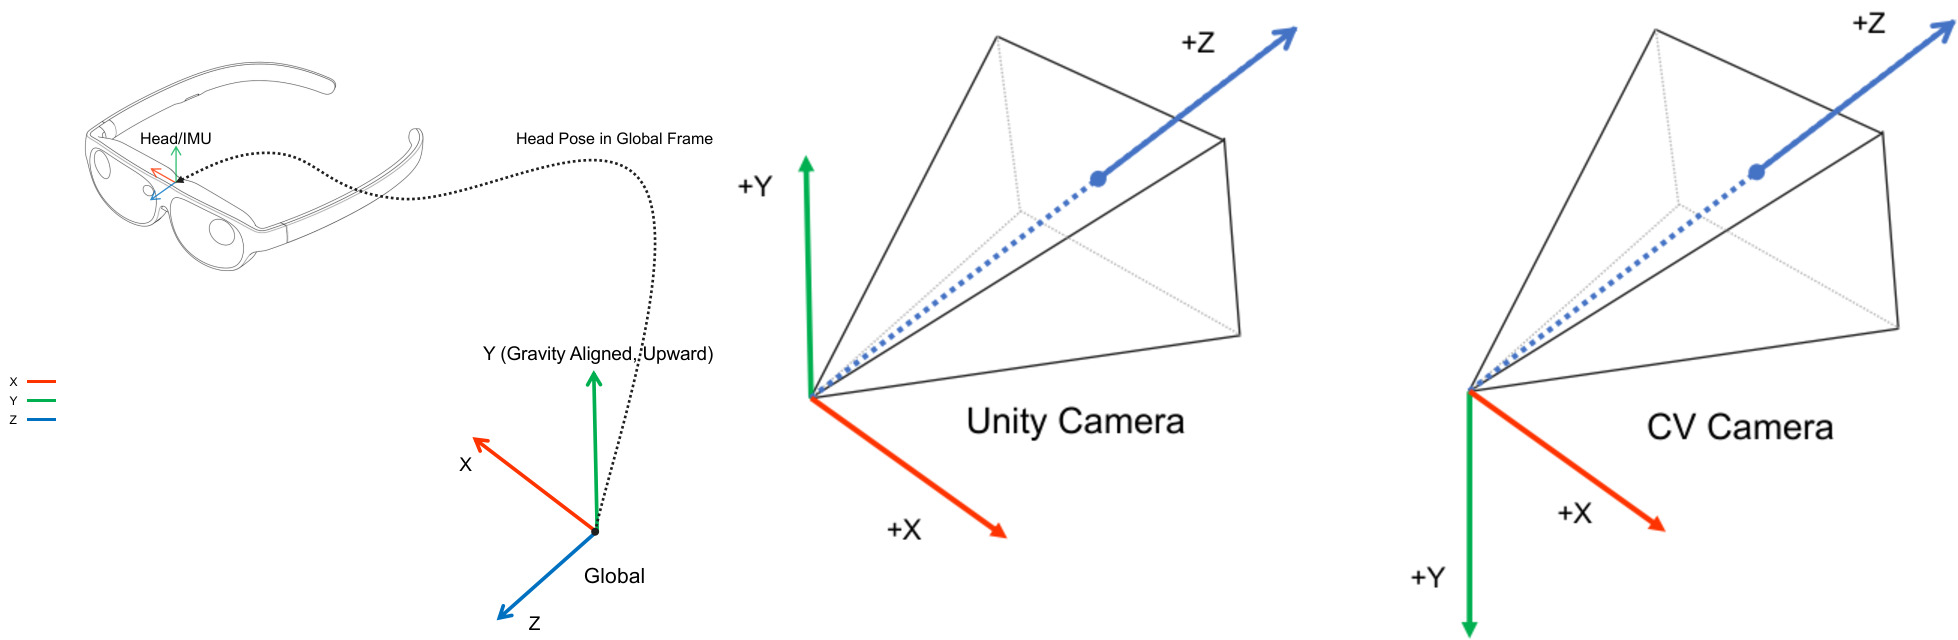
Below is the picture downloaded from Nreal website, showing the different coordinates for AR glass, world, Unity, and OpenCV. Those transformations are applied properly in the code.
Marker detection
In this project, I used a maker from the Aruco 6*6_50 family, with the ids of 0 and 1 to differentiate two feet. Using OpenCV for Unity package to convert Unity Texture2D object to OpenCV Mat format and detect markers and calculate the transformation from RGBCamera to the marker. And then multiply the world position of RGBCamera to get the world position of the marker.
Shoe detection
I also try to integrate some machine learning models to replace the Aruco Detection. However, a single RGB Camera can only provide 2D Detection results instead of 3D, and the detected result is not as accurate as the marker. So for now, the ML model is not used in this final demo. However, I will still talk about the process for collecting data, training the model, and deploying the model to Nreal AR glass.
Data collection
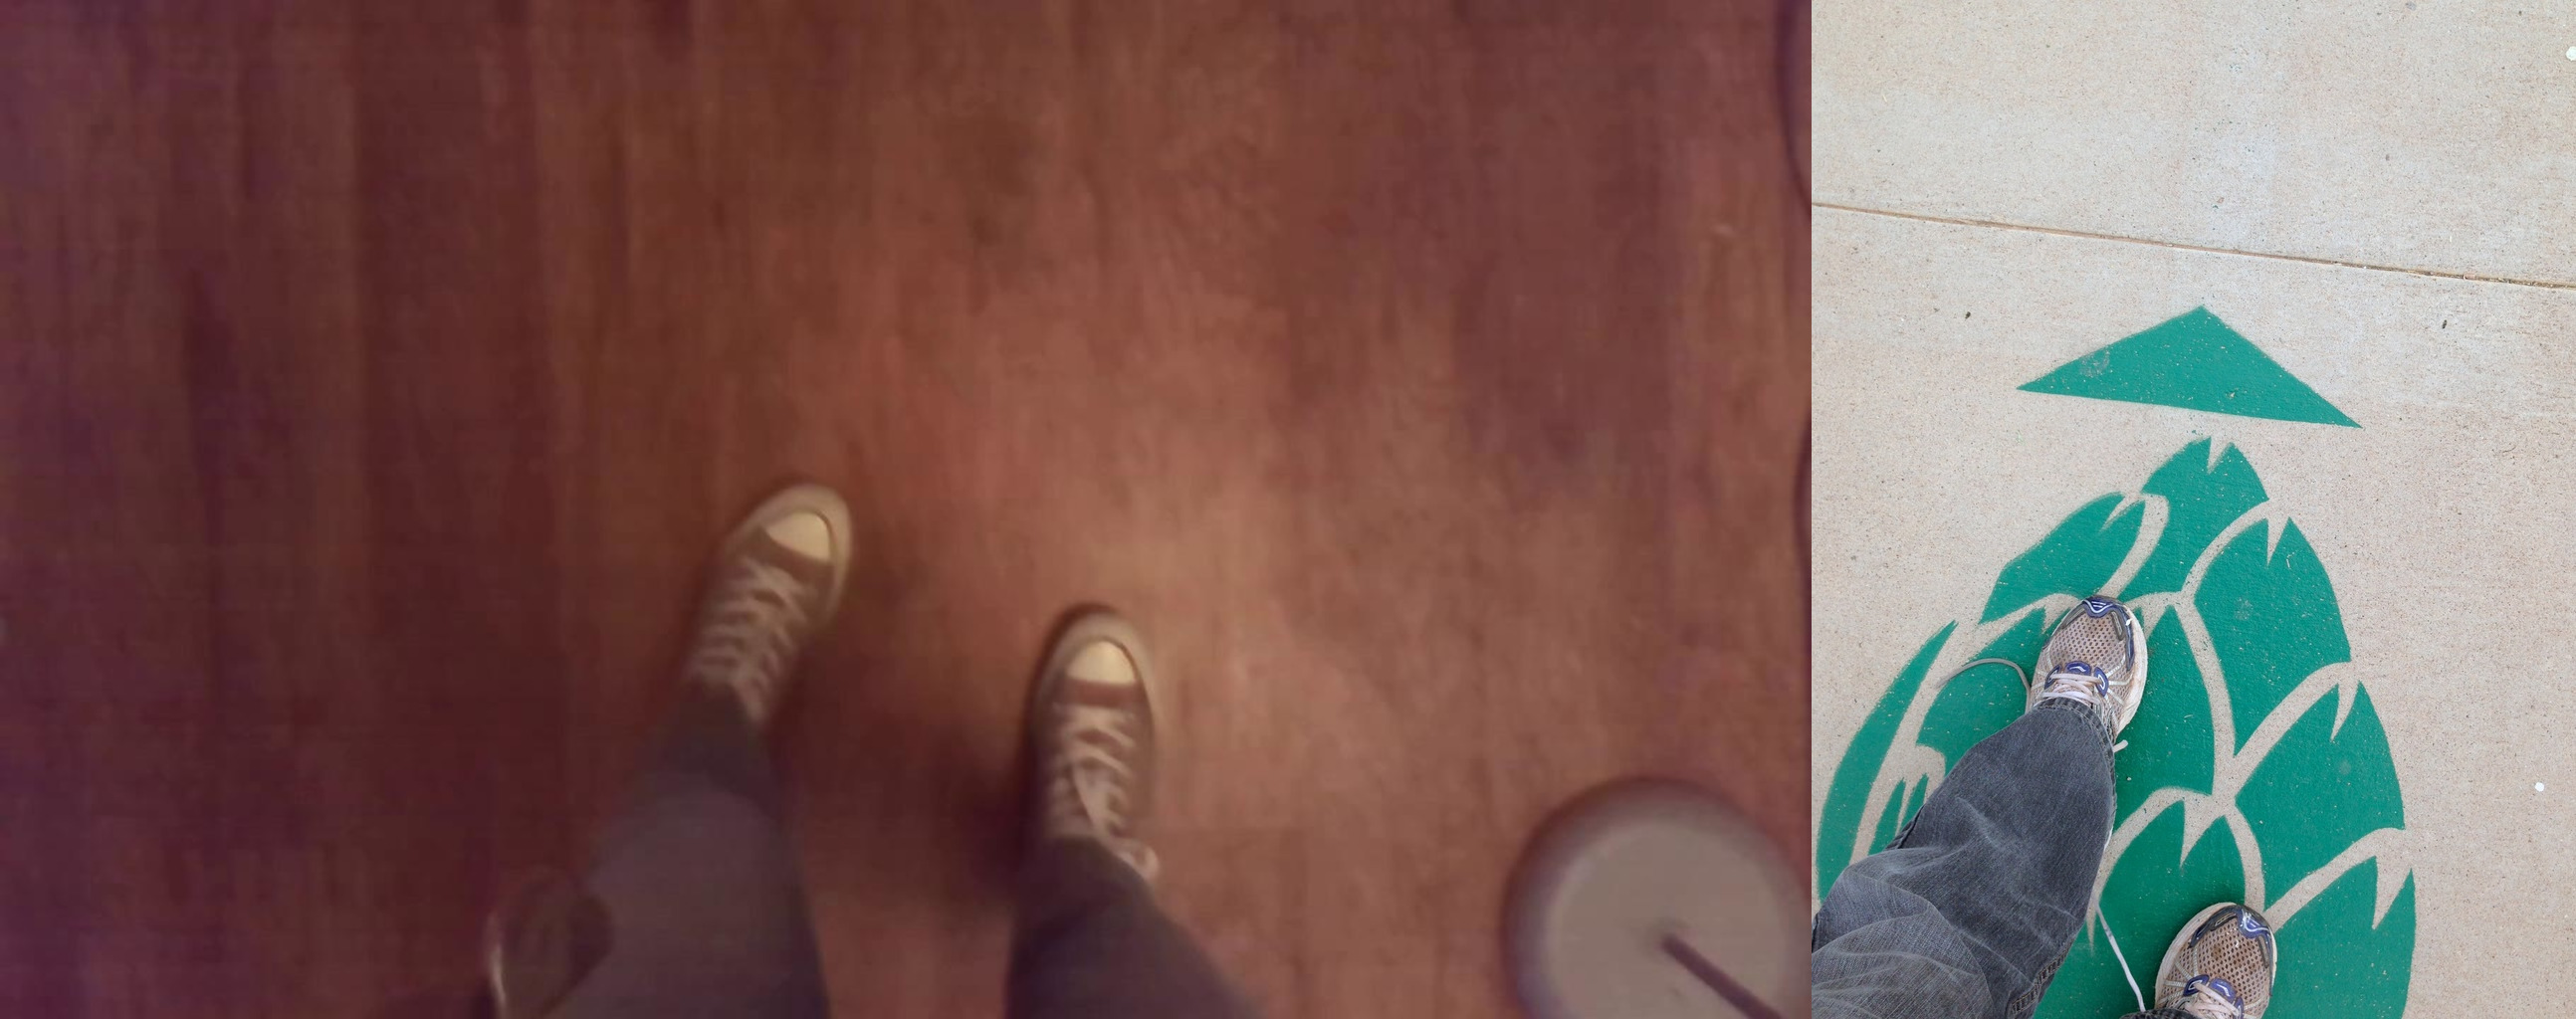
The goal of this sub-module is to detect shoes from the top-down view. Since RGB Camera is in the front of the AR glass, the only way to see the shoes from this camera is to bend our head.
Since the footwear dataset contains shoes shooting from all different directions and some of them are too small to recognize, I randomly downloaded 10,000 training images from Open Images Dataset V7 Detection with the label “Footwear” and manually selected 163 images that best suit the needs. Another part of the training images is extracted from video shooting by the RGB Camera on Nreal AR Glass directly. Here I only choose the frame where shoes are shown up in the image. So there are 450 images in the dataset. And then, use LabelImg to add labels to those images and save them as VOC data type and generate the txt file for train, validation, and test sets.
Model training
Next, I train images on YOLO v2 Tiny model. Since this model will be used on mobile devices, a light-weight model is needed. However, Barracuda doesn’t support SSD model for now, so MobilenetSSD is not a valid option.
Follow the step on the YOLO website to build the project. To train on GPU, modify the makefile to be GPU=1, CUDNN=1, OPENCV=1. Also, change the classes in cfg/tiny-yolo-voc.cfg to 1 and filters to 30. The number of epochs to save weights can be changed in examples/detector.c. I didn’t change any other hyperparameters in cfg file and the result is still very promising. I choose the model generated at 1900 epoch, the mAP is 84.06% for this model on the test dataset.
Model Deployment
Next, to integrate the model in Unity, I transfer the trained YOLO model to the ONXX form using Barracuda. Barracuda is a lightweight cross-platform Neural Networks inference library for Unity. Another common option to integrate deep learning models into Unity is to use the TensorFlowSharp package. However, that experimental package works with Unity 2019 but is not compatible with Unity 2021. So to install Barracuda 3.0.0, add “com.unity.barracuda”: “3.0.0” to manifest.json file in Packages.
To convert the YOLO model to the ONXX model, they first need to be converted from .cfg and .weights to the format .pb and .ckpt used by TensorFlow. I used DW2TF, repo for this step. My computer has Tensorflow 2.0, so to use those Tensorflow 1.x functions in the code, change the import line in cfg_layer.py and main.py.
#import tensorflow
import tensorflow.compat.v1 as tf
tf.disable_v2_behavior()
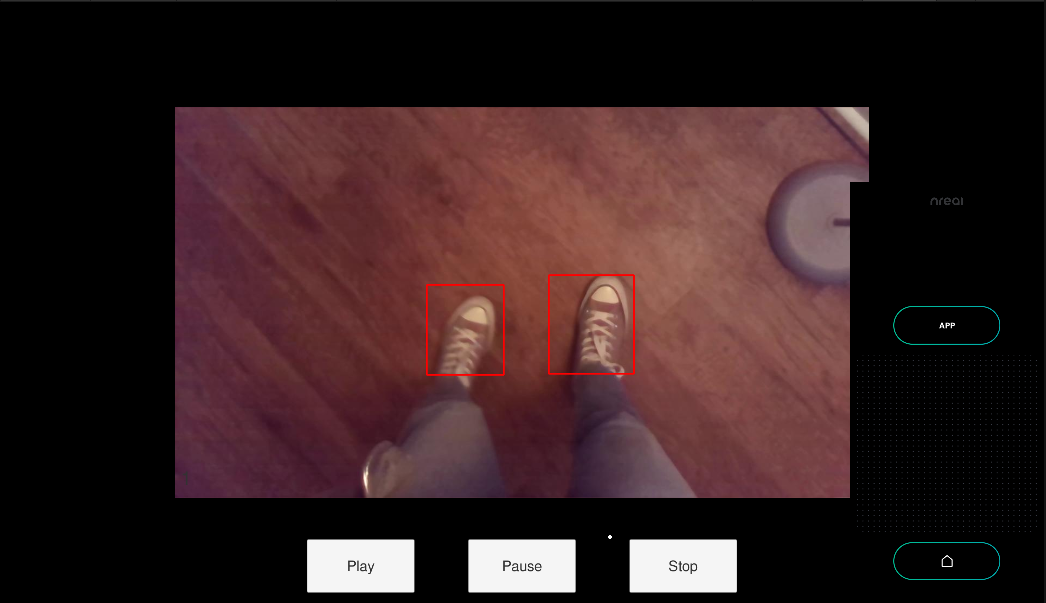
After converting, freeze the converted TensorFlow graph using TensorFlow freeze_graph tools. And the final step is to convert the frozen TensorFlow graph to ONXX format using tf2onnx. Finally, we get the model ready to be used in Unity for shoe detection. Here’s an example of the result of shoe detection in Unity with Nreal glass with given picture.
Future Development
To use the trained shoe detection model in a 3D setting, an extra sensor with depth estimation ability is needed. Also, the model still needs to be optimized for mobile device so the whole system can run faster.
I have to give special thanks to Prof. Matthew Elwin and Prof. Matthew J Major for giving practical advice for system development along the way. If you are interested in the details for this project, you can check out the github source code. You could also check this post for some Unity and Nreal glass development tips.